Processor - with methanol condenser (GL design)
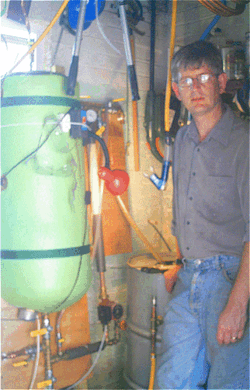
The GL Processor is a design by Graham Laming (hence GL processor) and has probably become most the popular processor design for homebrew Biodiesel production in the UK. The processor features built in dewatering and Methanol recovery capabilities, as well as protection against exposure to Methanol vapour. The design also lends itself to a variety of production techniques.
Contents
- 1 Basic design
- 2 Operating procedure
- 2.1 State diagram for the Basic GL processor
- 2.2 Step 1. (Oil In)
- 2.3 Step 2. (Heat Oil)
- 2.4 Step 3. (De-water Oil)
- 2.5 Step 4. (Cool the Oil)
- 2.6 Step 5. (Methoxide mixing and injection)
- 2.7 Step 6. (The reaction stage)
- 2.8 Step 7. (The 5% prewash)
- 2.9 Step 8. (Settle the glycerol)
- 2.10 Step 9. (Drain the glycerol)
- 2.11 Step 10. (Distil Methanol)
- 2.12 Step 11. (Drain and purify the biodiesel)
- 3 Subsequent modifications and additions to Graham's design
Basic design
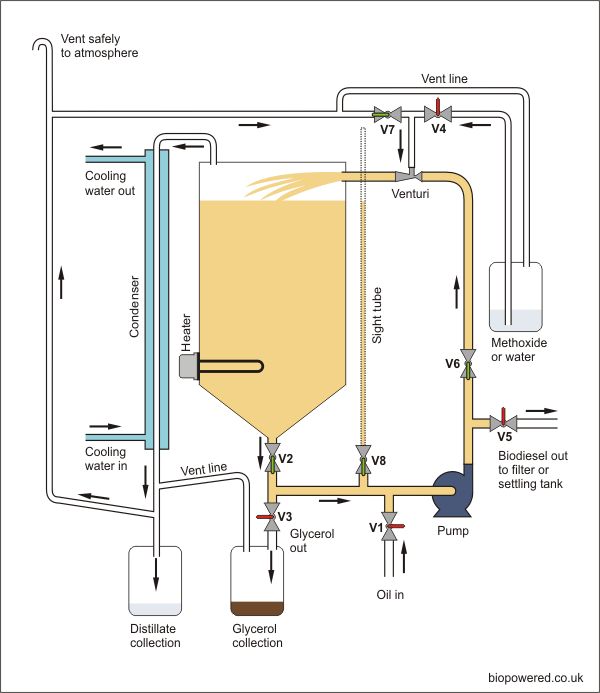
The design has been in existence for many years. It has been supplemented and improved by various users during this time. Below is a schematic of Graham’s basic design (with sight glass added) along with instructions on its use, which are reproduced with kind permission from Graham. Although the design has been modified by others, Graham’s basic design is capable producing high quality Biodiesel and, due to its simplicity of design, is suitable for those new to home production.

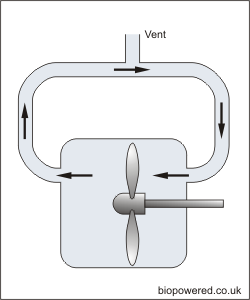
This is one of the most commonly asked questions. The answer is best described by the diagram above where the fan is located in a chamber. It blows the same volume of air out of the chamber to the left, as it sucks in from the right, so it creates a circulation. There is no vacuum or pressure in the circuit, therefore no air sucks in through, or blows out of, the vent.
The theory is exactly the same in the processor, except in place of a fan you have a venturi (far safer as there are no moving parts). The only time air will come out of the vent is when you add oil or Methoxide to the processor or when the oil and air expand wilst heated. Similarly when you drain glycerol or pump out the finished biodiesel, the vent will suck air back in.
Under NO circumstances must the vent be blocked.
This is a compact home made biodiesel processor which avoids water-washing and limits methanol release to very small amounts. You can also recover surplus Methanol from your biodiesel, which would otherwise be lost in the wash water.
You can de-water your oil in the processor and you can start to recover methanol from as low as 40°C.
Here's a diagram of the system. It includes a simple venturi to recirculate vapour through a 'Plumbers delight condenser'. The venturi also sucks methoxide (or water, if you do the 5% prewash) from the methoxide container and mixes it into the oil flow.
Allow a straight horizontal run of around 30cm after the venturi outlet to ensure the venturi will perform properly. This is because the momentum of the out-flowing liquid acts to "pull" on the inlet vapour.
You can mount the Methoxide tank up, nearer the venturi, if your venturi's performance is marginal. Make sure it is not too high - you don't want to drop the container, spill the methoxide, or hurt your back.
Operating procedure
State diagram for the Basic GL processor
This table tells you about the status of each valve, the heater and pump at various stages of the process.
State diagram: Green = valve open, pump running or heater on.
| Step | Heater | Pump | V1 | V2 | V3 | V4 | V5 | V6 | V7 | Notes |
| Oil in | Pre-filtered. | |||||||||
| Heat Oil | 50°C | Check level before applying heat. | ||||||||
| Dewater oil | 90°C | Switch to 50°C when O/P slows. | ||||||||
| Cool oil | 50°C | Titrate oil now. Empty collector. | ||||||||
| Inject Methoxide | Adj. | Allow 20 mins to inject. | ||||||||
| Reaction Stage | Allow 90 mins at 50°C. | |||||||||
| 5% Prewash | Mix 15 mins. | |||||||||
| Settle Glycerol | Wait 90 mins. | |||||||||
| Drain Glycerol | Drain slowly to avoid whirlpool. | |||||||||
| Distil methanol | 90°C | Check level before applying heat. | ||||||||
| Drain Biodiesel | Off | Adj. | Ensure heater is OFF first! Caution - Hot! Take sample and perform 3/27 test before discharging whole batch. |
Step 1. (Oil In)
Remove the glycerol collection tank from V3.
Turn on the pump, and open valve V6 only. Shut all other valves.
Your oil storage tank is piped to the 'Oil In' port. It should be above the level of the pump if your pump is not self-priming.
Your oil must be free of large chunks of debris, so your pump doesn't jam. There is no need to filter it (all the fine bits and pieces will end up in your glycerol layer). It must have no visible water in it.
Open valve V1 to load oil into the reactor. Shut valve V1 when the oil level in the reactor reaches 75% of its capacity.
This will leave the correct amount of space for the methoxide which you will add later. Don't under-fill the reactor - too much air space will affect your distillation performance.
Step 2. (Heat Oil)
Open valves V2 and V6, with the pump running, to recirculate oil around the tank.
Double check that your reactor is filled with the correct amount of oil. (75%)
Switch on the heater now, but ONLY if you are CERTAIN that the reactor is filled to 75% AND that the pump is running.
It is dangerous to add heat if the level is too low, because you may expose the heating element, which would then overheat and ignite the oil in the tank. You could have a tank explosion.
You must run the pump whenever the heater is on, so that there is a steady flow of oil to cool the element.
Step 3. (De-water Oil)
Dry oil is vital. Wet oil can create a soap-gel in your processor, which can easily block your pipework. Most used oil contains a large amount of water, even though it may look clear, so I recommend you de-water oil every time. This process is unique - you can de-water your oil in the processor, without any smelly, oily steam being given off. Here's how...
- Open V2 and V6 and V7
- Switch on the pump
- Heat the oil to 90C
- Circulate cold water thru the condenser
When the oil reaches 90°C, switch everything off and let the oil settle for an hour. It will now be thin because it is hot, so any particles of food will drop quickly to the bottom of the tank. After an hour, carefully open V3 and drain off 5% of the tank volume into a container (leaving the tank 70% full of oil). This drained off oil will contain most of the damp food particles which settled out. You can leave these to settle, then pour the remaining oil back into your WVO tank (not the processor).
Switch on the pump.
The venturi will drag dry air from the bottom of the condenser into the wet oil. As the oil sprays into the processor, it will carry the air with it, which becomes filled with moisture from the oil. The air now escapes out the top of the reactor and down through the condenser, where the water vapour condenses and drips into the distillate tank. The now dried air then goes back up to the venturi to be returned to the wet oil, for the process to repeat until the oil is dry. (You can fill the airspace with CO2 or N2 if you want an inert atmosphere)
You don't need to have a fresh supply of water for the condenser. I use a 45 gallon drum of rainwater, which I pump thru the condenser and back into the drum again, in a closed loop. I use a household heating circulator pump for this. A few litres a minute is enough if your heater is rated at 3kW.
Step 4. (Cool the Oil)
Maintain circulation of water through the condenser.
By the time the oil has cooled to 50°C, it should be dry enough for you to start the reaction...
Take a sample of oil from V3, leave it to cool to around 20°C and titrate it, to see how much lye you will need to add to the methanol.
To be safe, unplug your heater completely now, so that there is no way you can accidentally switch it on.
Close valve V7, and switch off the water pump feeding the cooling water thru your condenser.
Empty the water which collected in the distillate tank. You can put it into the cooling-water reservoir.
Refit the distillate tank.
Fit the glycerol collection tank to V3.
Step 5. (Methoxide mixing and injection)
Maintain circulation of water through the condenser.
You titrated your dried oil, so can now make up your methoxide.
Calculate how much oil is in your tank. Multiply by 0.22. That is how much methanol you must measure put into the methoxide tank.
If you are using NaOH, you will need 5 grams of NaOH as your base amount, plus titration amount, for every litre of oil. If you are using KOH, the base amount will be 7 grams. Pour the NaOH or KOH into the methanol and agitate until it is all dissolved.
Connect the methoxide tank to V4 and the vent.
Switch on the pump. Gradually open V4 to allow the suction to draw methoxide out of the carboy.
Aim for a feed rate slow enough so the methoxide is fully dosed into the reactor over a period of around 20 minutes. If you dose too fast, the methoxide may flood into the processor so concentrated, that it just floats on top of the oil. You may also get an unwanted gel forming in the piping or tank, which can cause blockages. (Since Graham published this design, it become widely accepted that the Methoxide can be introduced at full bore without detrimental effect)
As the tank fills up, the air it displaces (the same volume of air as there was methoxide in the carboy) passes thru the condenser and back into the methoxide carboy. The condenser helps to reduce any outgassing of methanol - don't worry about the drips of methanol which collect in the distillate collection tank. It will be very little, and will not affect your reaction. At least you have saved the methanol, rather than venting it out to the air.
When the dosing is complete, shut off valve V4 and stop the flow of cooling water thru the condenser.
Step 6. (The reaction stage)
V2 and V6 should be fully open. Check that V4 and V7 are closed, and that the heater is OFF.
Allow the pump to run for around 90 to 120 minutes, which should be long enough for your reaction to reach its peak of conversion from oil to biodiesel. Your temperature should remain at around 50°C throughout the reaction, if your insulation on the tank and piping is adequate.
After the reaction period has elapsed, switch off the pump, close V2 and carefully remove the methoxide container - be careful not to spill any methoxide on yourself, wear suitable body protection.
Step 7. (The 5% prewash)
Fill the methoxide container with water; the amount should be 5% or 1/20th of the amount of oil you dosed the tank with. (Since Graham published this design, it has been found that 7% water can be used offering greater capacity for soap removal without the risk of forming emulsions)
Re-connect the container, open valve V2 and switch on the pump. Open V4 fully to allow the pump to draw the water out of the carboy. You can close V2 to allow the pump to draw water fast out of the container, as it is not important for it to be gradually introduced.
When all the water has been pumped out of the container, close V4 and fully open V2. Allow the pump to recirculate the mixture for around 15 minutes to ensure the water has been evenly blended throughout the mixture.
When the 15 minutes have elapsed, switch off the pump and close valve V2. The water will tend to attract soap from the biodiesel, along with glycerol and caustic soda, and together they will drop to the bottom of the tank, where they can then be easily drained off, leaving semi-purified biodiesel behind ...
Step 8. (Settle the glycerol)
Glycerol and water are both denser than biodiesel so will drop to the bottom of the reaction vessel, carrying with them most of the soap which is formed as a byproduct, and the catalyst. Allow 90 minutes or more for this settling to happen. Be aware that if you leave the processor too long, say more than a few hours, the settled glycerol in the pipework may form a thick gel, especially in cold weather. This can block your pipework and jam the pump.
To prevent this from being a big issue if you need to leave the processor like this for a few hours, you can part-drain the pipework after around 30 minutes. Ensure V2 and V1 are closed, and V6 is open. Open V3 slightly, to drain off the dark glycerol in the pipework. Stop draining when you see the liquid colour turn much lighter, as this will be biodiesel, which you don't want to drain off just yet.
Step 9. (Drain the glycerol)
Slowly open valve V2. open valve V3 slightly to allow a slow trickle of glycerol to fall into the glycerol collection container. Depending on your oil quality, you can typically expect to collect from 15% to 25% of the volume of the oil you used, as glycerol. You will be able to see when all the glycerol has been drained, because the drained liquid will suddenly become much lighter - biodiesel. Close V3 completely now and wait a couple of minutes. Re-open V3 very slightly and you should be able to drain off a little more glycerol. When no more glycerol flows, close V3.
Step 10. (Distil Methanol)
We now want to extract all the methanol from the biodiesel. This allows us to use methanol which would otherwise be released to environment, and it greatly helps us to clean the biodiesel, because any remaining soap and glycerol in our biodiesel will fall out of solution if there is no methanol present. This phenomenon allows us to clean our biodiesel by using filtration or settling alone, no water is needed.
IMPORTANT: Check that the biodiesel level in your reactor is WELL above the heater element. If it is not, do not under any circumstance proceed, because if your element is exposed in the presence of biodiesel and methanol and air, there is a strong risk of fire or explosion.
If you are happy that your heating element is completely covered, you can proceed to distil.
Check that your distillate collection vessel, byproduct collection vessel and methoxide carboy are all tightly fitted and have no leaks.
Open valves V2 and V6 and V7. Switch on your cooling water feed for the condenser jacket.
Switch on your pump. The flow of biodiesel through the venturi will draw vapour through the condenser, up to the venturi, through V7, where it will be mixed with the biodiesel, be sprayed into the vapour space at the top of your reactor vessel, and will leave thru the top of the reactor tank, freshly laden with methanol fumes, to pass thru the condenser again, on an ever-repeating cycle.
Even at a temperature of only 50°C, you will see that you start to collect methanol liquid in your distillate collector.
If all seems to be working well, switch on your heater, and set your thermostat for 90°C. You will soon see that the rate of methanol collection rises steadily, as you approach and reach the boiling point of methanol in your biodiesel.
Your rate of methanol recovery will depend on many factors, mainly heating power and insulation quality of your tank. I use 3kW heating on 80 litres of biodiesel, with a 'Plumber's Delight' condenser 1 metre long. It takes me around 90 minutes to recover around 2 litres of methanol from the 80litres of biodiesel.
Make sure all piping carrying the hot methanol vapours is well insulated, and that the top of the tank is well insulated too. Your cooling water should be as cool as practical, the cooler it is, the faster you will be able to condense the methanol vapour passing thru it.
When you have finished distilling, SWITCH THE HEATER OFF ! Very important. You do NOT want to drain your biodiesel out of the tank with the heater element still on. As the element becomes exposed, it would glow red hot and ignite any fumes in the tank , with possible lethal effect.
Switch off and unplug the heater. Close valve V7 Turn off the cooling water for the condenser.
Step 11. (Drain and purify the biodiesel)
If you are sure that the HEATER IS SWITCHED OFF, you can now pump your biodiesel to an open topped settling tank. Valve V2 should be open, V6 closed, V5 gradually opened to allow the biodiesel to pass to the settling tank.
IMPORTANT! - Do NOT use flexible plastic hose between V5 and the settling tank. Use a fixed metal pipe. This is because the biodiesel is very hot and the hose would soften too much. You would run a serious risk of having hot biodiesel spray onto you.
As the biodiesel cools in the settling tank, soap and any remaining glycerol will drop to the bottom over the next few days.
Before your next batch of biodiesel, you can scoop out any settled soap and let it drain in a cloth bag, so that any biodiesel in it returns to the tank. Or you can scoop out the soap after every 2nd, 5th etc batch. It is up to you, depending on the capacity of your settling tank.
You should not completely drain the tank, because the lower layers will always have reasonably high soap content. The upper 50% should be reasonably soap free after several days' settling under gravity alone.
Subsequent modifications and additions to Graham's design
Additional valve to allow use of sight tube whilst filling
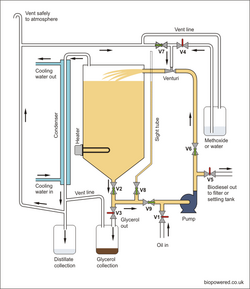
With the arrangement shown above it’s not possible to use the sight tube whilst filling the processor with oil. The addition of one valve will make this possible, shown as valve V9 on the schematic, right (click to enlarge).
With this valve closed, valves V2 and V8 can remain open during the filling operation allowing the sight tube to be used whilst the pump is running.
Higher performance pump
The original design employed a central heating pump, but it has been found a centrifugal pump of around 40l/m (typically a TAM 105 or a Leo XKM60) for an 80 - 100 litre batch size offers better mixing and improves venturi performance. With improved mixing and venturi performance most users no longer find it necessary to introduce the Methoxide gradually. It's now common practice to allow the venturi to entrain the Methoxide at its maximum rate.
Low oil level interlock
The one flaw with this design of processor is the possibility of running the heater, part of which is exposed above a low liquid level. Two methods of preventing this have been introduced, both of which interlock with the heater to prevent it being switched on when the oil in the processor is below a predetermined level.
Non siphoning, in-line heater
Later devised by Graham but not included in his original design, this unit comprises a small tank fitted with flow and return ports and housing a heating element. It is designed in such a way that liquid is trapped in the tank even when the system is drained. They remove the need for an in-tank heating element but are not in themselves fool proof. See In-line heater.
Mixing eductor
This is a devise mounted inside the processor operating on the venturi principal and driven by the existing pump. It creates a turbulent circulation within the tank and significantly reduces processing times. See Mixing eductor
PID temperature controller
Instead of using the thermostat built into immersion heaters which will not allow high distilling temperatures, many users are now employing PID controllers. These units control to a far greater accuracy, without hysteresis, and across a broader temperature range. See PID controller
Flash evaporator
Driven by an additional pump, this device often referred to as a “squirrel” for no particular reason, sprays Biodiesel into the ullage space of the processor to accelerate the demething process. See Flash evaporator
Still head heat exchanger
This is an additional heat exchanger or condenser, one path of which accepts the vapour flow between the processor and the condenser and the second path accepts the flow from between the condenser and the venturi. The purpose of this unit is to recover some of the heat normally lost in the process and to reduce the load on the main condenser making it more efficient. See Still head heat exchanger
Multi tube condenser
With the advent of larger pumps and flash evaporators it was found that a single tube condenser had insufficient capacity. In order to cope with the additional loading multi tube condensers have been introduced. See Multi tube condenser


