Difference between revisions of "Water in fuel - test kit"
| Line 37: | Line 37: | ||
===Assembly instuctions=== | ===Assembly instuctions=== | ||
| − | Put the plumbing together as in the photo with the low pressure gauge on the valved side | + | *Put the plumbing together as in the photo with the low pressure gauge on the valved side |
| − | Drill a hole in the stopend | + | *Drill a hole in the stopend |
| − | Weld both access plugs to the joiner | + | *Weld both access plugs to the joiner |
| − | Weld one screw cap on | + | *Weld one screw cap on |
| − | Drill two holes in the unwelded cap,one for the male stopend,one for the presta valve | + | *Drill two holes in the unwelded cap,one for the male stopend,one for the presta valve |
| − | Fit the stopend through the hole into the Y piece and seal (i used araldite) | + | *Fit the stopend through the hole into the Y piece and seal (i used araldite) |
| − | Fit the valve using two of the round nuts that stop the valve creeping and seal | + | *Fit the valve using two of the round nuts that stop the valve creeping and seal |
| − | Replace the rubber seal in the lid with a Viton one | + | *Replace the rubber seal in the lid with a Viton one |
| − | Glue the small cap to the inside about 3/4" down | + | *Glue the small cap to the inside about 3/4" down |
| − | Drop in the marble | + | *Drop in the marble |
| + | |||
| − | |||
Revision as of 10:40, 31 July 2011
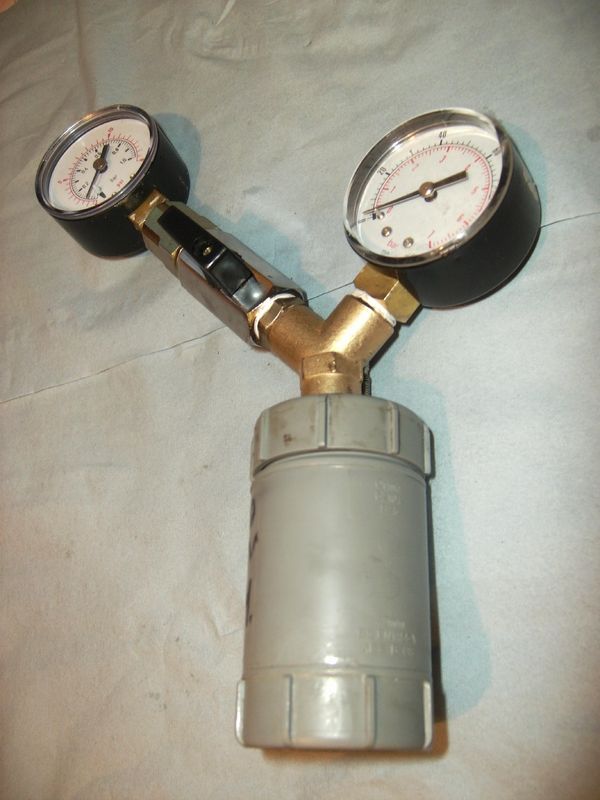
How to make a cheap water test kit
Contents
The TOC tag creates a content box. The text it contains is generated automatically based on the page headings. Delete this text once you have read it.
Parts list
- 1/4" pressure gauge 0-15 psi
- 1/4" pressure gauge 0-100 psi
- 1/4" Y piece
- 1/4" Ball valve
- Bicycle "presta" valve
- 1/4" male stopend
- 2 x 43mm solvent weld access plugs
- 43mm solvent weld joiner
- Small plastic cap/cup
- Small marble
- Viton O ring
Instead of the presta valve and 0-15 gauge you can use a low pressure gauge designed for motorcycle forks which has a button for releasing the pressure total cost roughly £20
Assembly instuctions
- Put the plumbing together as in the photo with the low pressure gauge on the valved side
- Drill a hole in the stopend
- Weld both access plugs to the joiner
- Weld one screw cap on
- Drill two holes in the unwelded cap,one for the male stopend,one for the presta valve
- Fit the stopend through the hole into the Y piece and seal (i used araldite)
- Fit the valve using two of the round nuts that stop the valve creeping and seal
- Replace the rubber seal in the lid with a Viton one
- Glue the small cap to the inside about 3/4" down
- Drop in the marble
Second sub-heading here
Text and photo content here ...
Delete if not required.
Second heading here
Text and photo content here ...
Delete if not required.
First Sub-heading in second heading here
Text and photo content here ... Delete if not required.
Second Sub-heading in second heading here
Text and photo content here ...
Delete if not required.
etc etc
End the page with the headings below...
See also
Use if there are similar pages in the wiki, if not delete.
- Link within this wiki here
- Link within this wiki here
- Link within this wiki here
References
Use if you need to cite reference material you've used , if not delete.
- First ref here
- Second ref here
Further reading
Use if you can detail any useful reading matter, if not delete.
- Book details here
- Book details here
- Book details here
External links
Use if you can list any useful links on the internet, if not delete.
- Link outside this wiki here
- Link outside this wiki here
- Link outside this wiki here
Originator to sign and date here by using 4 "squiggle marks"
... delete this "nowiki" tag once you have set your categories (it's just there to stop this section getting indexed on the main page!)
Add categories ... By using categories your page will get indexed on the wiki main page.
For Biodiesel ...
[[Category:Biodiesel]] sets the main category.
Now select one from the following, deleting the others:
[[Category:Introduction to Biodiesel]]
[[Category:Ingredients and preparation]]
[[Category:Processing methods]]
[[Category:Processors and equipment]]
[[Category:Finishing]]
[[Category:Safety and Testing]]
Do the same for Veg oil ...
[[Category:vegetable oil]]
Select one from the following, and delete the others:
[[Category:Introduction to veg oil use]]
[[Category:Collection & regulations]]
[[Category:Filtration & drying equipment]]
[[Category:Testing]]
[[Category:Vehicle modifications]]
If your page is applicable to both veg and bio, you can have a total of four category listings.
Please Note: To get your page indexed on the main page it is necessary, to got to the main page, click the edit tab and then click save.
... delete this "/nowiki" tag once you have set your categories (it's just there to stop this section get
