Difference between revisions of "Processor build step by step"
| Line 110: | Line 110: | ||
==Attaching the Cone and Drum== | ==Attaching the Cone and Drum== | ||
| − | + | If you've got this far then the welding is no more complex than the welding involved in making the cone, just a little more of it. The method used here was to mount the cone in a vice and place the barrel on top. By pushing down on the barrel, the bottom of the barrel and the top of the cone are forced to take up the same shape and any gaps between the two disappear. At this point the two can be tack welded together. More tack welds will hold the shape better but then there are more tack welds to remove as you complete the permanent weld. Anything between 8 and 12 is fine. A fillet weld is fine at this time as it is only to hold the barrel in place. | |
| + | When the barrel is suitably located take the assembly down and weld on the bench. At this point use a small hammer to bend the edge of the cone down to sit flush against the barrel for a lap weld. Hammer an inch or two flat at a time, weld and repeat. When you get close to a tack weld, you'll need to grind it out so that you can continue with the hammering and welding, i,e. so the lap joint is continuous. | ||
| − | <gallery caption="" widths="200px" heights="300px" perrow="4" align="left"> | + | |
| − | File: | + | <gallery caption="Attaching the cone" widths="200px" heights="300px" perrow="4" align="left"> |
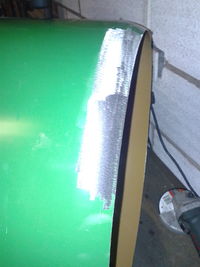
| − | File: | + | File:Welding.JPG|This is suitable only for holding the cone to the barrel and is not a suitable weld for sealing. |
| − | File: | + | File:20140411 194606.jpg| |
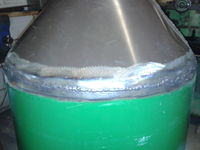
| + | File:Weldinglap.JPG|One the cone is held in place hammer the edge of the cone flat as seen here and proceed to weld the lap joint. | ||
| + | File:20140411 204057.jpg| | ||
| + | File:20140411 210357.jpg| | ||
</gallery> | </gallery> | ||
Revision as of 20:56, 15 April 2014
There are a number of ways you can get hold of, or make a tank. This page describes how a tank can be made using a 44 gallon drum and a home made come.

Contents
Welding Considerations
Settings, Wire and Gas
Welding thin metal is much harder than welding thick chucks of framework. If you have limited experience welding thin steel (like the author) then practice of some offcuts and make sure you can get a smart weld. If it looks tidy and flat then it is far more likely to seal. If the welding isn't going well then there is something wrong, don't keep piling on the weld as it is very unlikely to seal. Try any of the following:
changing the power setting
Changing the feed rate
Make sure there is enough shield gas
Cleaning out the end of the gun
Changing the tip.
Check you are using an appropriate wire thickness.
Check you are using an appropriate shield gas.
If you are putting holes in the steel sheet and have tried all of the above, it might be that your welder does not have a low enough setting for such thin material in which case use the "on, off" technique. weld for a few seconds then let off for a second and restart, this gives the sheet just long enough to cool in the gaps so that a hole does not appear. Again this needs practice before starting on the drum.
The cone in this article was welded with 0.8mm wire and a CO[sup]5[/sup] shield gas. It was not easy! It was a miracle that it didn't leak. The better combination was 0.6mm wire and a proportion of argon gas. The author used 100% argon although other might recommend a mix. The exact gas is outside of the scope of this article.
Welded joint types
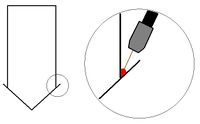
It was initially thought that a fillet weld was a good idea as in the illustration below. However advice from the forum and experience while tacking the cone to the drum both proved this was a bad idea.
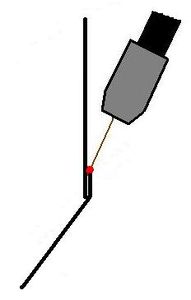
A butt welded joint is neat if you can pull it off. It is a very difficult joint to get right as the two sheets of metal need to meet all the way along the joint with no significant gap. With a joint like this it is very easy to make holes. It is recommended that you don't do this unless you are experienced in welding.
A lap joint is by far the easiest joint to go with. The cone in the this article was attached to the barrel with a welded lap joint. It was easily done and sealed well (only 3 minor leaks). This joint is easily done as there is more material to disperse the heat (hence harder to make holes) and its much easier to get the two sheets close together with no gaps (just hammer then together).
- Welded joints
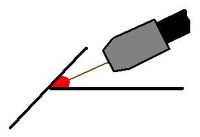
This was fine for tacking the cone in place (see below) but is not suitable for a sealed welded joint.
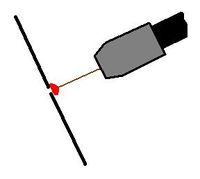
This is very difficult to do without putting holes in the sheet, so it is recommended to avoid this type of joint.
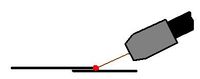
This is the easiest joint for an novice welder (like the author), the least likely to put a hole in, and the most likely to seal.


Preparing the Barrel
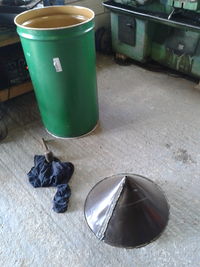
Steel Barrels have either a solid top with a small cap or a fully removable lid with a band around the top to seal it. This depends on what the barrel was originally intended to do. Most liquids usually have a small cap with the clip top barrels typically used for powder products. Both are readily available. The barrel pictured here originally contained fruit juice but had a membrane inside so a "clip top" barrel was used. This barrel cost the author £10 and as a result of the membrane has no corrosion inside.

The Barrel when it was bought, the membrane was not in place, the clip was included but not photographed.
Cut the bottom off the barrel leaving a little of the curved edge intact. This will mean the cone needs less shaping (hammering) to fit the profile of the barrel.
Remove all of the paint from the area where welding will take place. It might be a good idea to remove paint from the inside surface too, as the gasses released from the burning paint can interfere with the welding.


Preparing the cone
This section is brief as there is a wiki page specifically for making a cone. If you are using this write-up and making your own processor tank you will need to visit the following page for the specifics on making a cone:
http://www.biopowered.co.uk/wiki/Cone_bottoms_for_tanks
It is worth considering these extra points in addition to the information found in the cone wiki page:
The barrel is made from 0.8mm sheet steel so it would be sensible to find some sheet of the same thickness for making the cone.
It might be worth adding a tab to the straight edge of the cone to help with welding it up.
There is no harm in making the cone bigger than it has to be and trimming it back later. In fact this is important to the welding method used in this write up.
Leave the hole in the middle of the cone smaller than you intend, until the cone is welded up. You might have the right size hole as per the calculations, but it is easy to make that hole the wrong the shape when you're bending the cone to shape and welding.
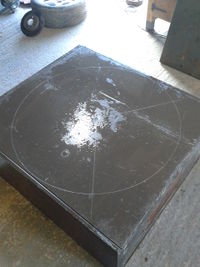
After much looking around for sheet steel it was decided the back of this cupboard was suitable so it was marked up and cut out.
The cone was welded on the inside and the outside to give a better chance of sealing.
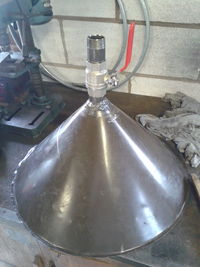
Once the cone is welded up, cut the hole in the bottom of the cone to the right size. You can carefully use a hole saw or a dye grinder. Then weld the nipple in place. The size of the nipple depends on your choice of pump.


With a suitable size ball valve fitted you can mount the assembly in a vice, add water and check for leaks. You will need to check for leaks after attaching the cone to the barrel, however it is a good idea to check the cone at this point as it is much easier to repair when not attached to the barrel.
Attaching the Cone and Drum
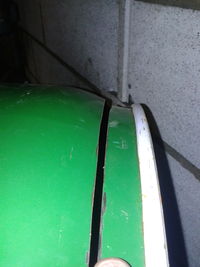
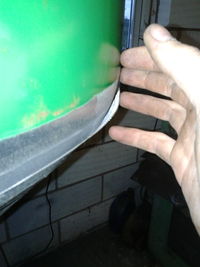
If you've got this far then the welding is no more complex than the welding involved in making the cone, just a little more of it. The method used here was to mount the cone in a vice and place the barrel on top. By pushing down on the barrel, the bottom of the barrel and the top of the cone are forced to take up the same shape and any gaps between the two disappear. At this point the two can be tack welded together. More tack welds will hold the shape better but then there are more tack welds to remove as you complete the permanent weld. Anything between 8 and 12 is fine. A fillet weld is fine at this time as it is only to hold the barrel in place.
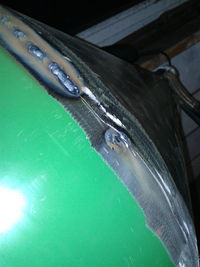
When the barrel is suitably located take the assembly down and weld on the bench. At this point use a small hammer to bend the edge of the cone down to sit flush against the barrel for a lap weld. Hammer an inch or two flat at a time, weld and repeat. When you get close to a tack weld, you'll need to grind it out so that you can continue with the hammering and welding, i,e. so the lap joint is continuous.
- Attaching the cone
This is suitable only for holding the cone to the barrel and is not a suitable weld for sealing.
One the cone is held in place hammer the edge of the cone flat as seen here and proceed to weld the lap joint.


See also
Use if there are similar pages in the wiki, if not delete.
- Link within this wiki here
- Link within this wiki here
- Link within this wiki here
References
Use if you need to cite reference material you've used , if not delete.
- First ref here
- Second ref here
Further reading
Use if you can detail any useful reading matter, if not delete.
- Book details here
- Book details here
- Book details here
External links
Use if you can list any useful links on the internet, if not delete.
- Link outside this wiki here
- Link outside this wiki here
- Link outside this wiki here
Originator to sign and date here by using 4 "squiggle marks"
... delete this "nowiki" tag once you have set your categories (it's just there to stop this section getting indexed on the main page!)
Add categories ... By using categories your page will get indexed on the wiki main page.
For Biodiesel ...
[[Category:Biodiesel]] sets the main category.
Now select one from the following, deleting the others:
[[Category:Introduction to Biodiesel]]
[[Category:Ingredients and preparation]]
[[Category:Processing methods]]
[[Category:Processors and equipment]]
[[Category:Finishing]]
[[Category:Safety and Testing]]
Do the same for Veg oil ...
[[Category:vegetable oil]]
Select one from the following, and delete the others:
[[Category:Introduction to veg oil use]]
[[Category:Collection & regulations]]
[[Category:Filtration & drying equipment]]
[[Category:Testing]]
[[Category:Vehicle modifications]]
If your page is applicable to both veg and bio, you can have a total of four category listings.
Please Note: To get your page indexed on the main page it is necessary, to got to the main page, click the edit tab and then click save.
... delete this "/nowiki" tag once you have set your categories (it's just there to stop this section getting indexed on the main page!)