Soldering
An essential part of Biodiesel processors or systems for Filtering waste vegetable oil is the pipe work connecting the components. In the UK, and many other countries, copper pipe is most commonly used for domestic plumbing, and whilst copper is not the ideal material, the majority of domestic biodiesel producers use it in processor construction without problem. The pipes will require joining and most of these joints are soldered together. Whilst this page details soldering pipes, the technique is equally applicable joining of other components such as fittings to the processor or fabricating an eductor.
Contents
Safety
Wear suitable protective equipment, eye protection at the minimum, and take care with hot metal and naked flames. Copper is a good conductor of heat and often pipes can cause a serious burn 300mm or more away from the joint. Where possible remove the items to be soldered away from the processor and do not solder anywhere near the chemicals employed in making biodiesel. If you are soldering on the processor, fill it with water, heat to around 60°C or more and run the pump and venturi circuit, if you have one, to ensure you have removed any traces of flammables.
Over view
There are several ways to join copper pipes most of which are easy enough to be carried out by those with little or no experience, provided care and logic are applied to the job.
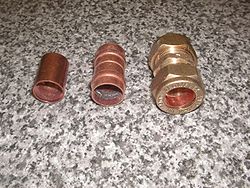
- End feed fittings
- Solder ring fittings
- Formed sockets
- Compression fittings
All but compression fittings require soldering together. Formed sockets are soldered in the same way as end feed fittings but the equipment to make them is beyond the scope of the amateur, so this page will deal with using the first two types of fittings.
End feed fitting provide sockets into which the pipes fit. Solder is applied to the joint to fill the gap between, and adhere to, the pipe and fitting. These fittings are cheap to buy but require a little more skill to use.
Solder ring fittings are similar to end feeds but have a ring of solder built into the socket so that all the solder required for the joint is already in place. These fittings are more expensive to buy but are much easier to use by the inexperienced.
Equipment required
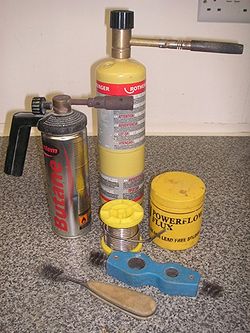
Gas torch
Copper is an excellent conductor of heat so a Propane or preferably a MAPP gas torch will be required to provide sufficient heat to make the joint, soldering irons are not suitable.
Solder
This is available in many grades and types, but the most commonly available for domestic plumbing is either Lead free or leaded solder. Lead free is more expensive and intended for use on potable water supplies. Leaded solder is cheaper and can be used on central heating systems. Many people are of the opinion that leaded solder is easer to use and this will be fine for work on a processor.
Flux
Flux is used for final cleaning of the joint surfaces and assisting the solder to adhere. There are many types of flux and, within the sphere of domestic plumbing, most fluxes will work with most solders, however, if in doubt try and buy flux and solder made by the same manufacturer. Liquid flux is available but flux paste will be found far more convenient to use. Flux is acidic and it shouldn’t be allowed to come into contact with the skin. Flux brushes are available but any clean, small brush will do to apply it to the joint.
Cleaning equipment
Both pipe and fitting must be cleaned to bare bright metal to ensure all surface oxides are removed. This can be achieved using items such as kitchen scourers, fine sand paper, wire wool or specially shaped wire brushes designed for the job. With sand paper and scourers wipe with a clean cloth afterwards to ensure all grit partials are removed. Don’t use wire wool unless you are sure what you are using is oil free. Some types of wire wool contain oil to prevent rusting.
A clean, dry cotton cloth may be found useful in wiping the finished joint if you are concerned about aesthetics. Do not use man made fibres as these could melt when applied to a hot pipe.
A damp cloth will be needed for removing any flux residues from the finished joint
The soldering process – end feed fittings
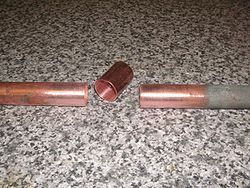
Clean the pipe externally and the fitting internally to a bright shiny finish. Once clean, don’t touch the parts with your fingers for risk of contamination.
Wipe each surface with flux using the brush and assemble the parts. If these can be orientated so you are not soldering up-side-down, so much the better.
Start by heating the pipes either side of the joint. This will reduce the amount of heat conducted away from the joint and transfer heat to the pipe inside the joint. Try and apply heat on opposite sides to ensure even heating. Don’t get things too hot. Once you see the flux start to melt and run move the heat to the next bit of pipe.
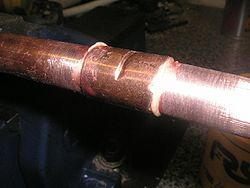
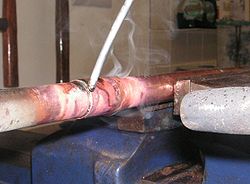
Transfer the torch to the fitting and heat that up. Again try and heat from two sides. Observe the flux carefully. Just after it melts and starts to run you should notice the copper getting slightly more shiny as it cleans the surfaces. With a little more heat it should be at a suitable temperature to introduce the solder. Dip the end of the solder in the flux, move the flame further away from the joint and just touch the solder to the edge of the fitting where it meets the pipe. Do not play the flame on the solder itself. If the joint is hot enough, the solder should melt and get sucked into the joint by capillary action. If the solder doesn’t run heat the joint a little more and try again. Provided you have heated the joint evenly the solder should run all around the joint. If it only runs half way round apply a little heat to the opposite side and reapply the solder. When you can see a molten solder ring for the entire circumference of the joint, you’ve finished.
Any runs or drops of solder (known endearingly as “snots” in plumbing circles) can be wiped away with the dry cotton cloth and the joint left to cool. Obviously the cloth will need to be folded several times to prevent you getting burnt. Once the solder has solidified but the pipe is still hot, any residual flux should be wiped away with the damp cloth.
The soldering process – solder ring fittings
The process for solder ring fittings is very similar to end feed fittings above as are the problems and remedies, below. The main difference being that you don’t need to apply solder, it’s already in the joint.
Prepare the joint, apply flux and assemble exact as above. Then apply heat, watching the behaviour of the flux. Just after the flux runs, with a little more heat you should notice the molten solder well up and become visible around the joint. Ensure that is has run the entire circumference of the joint. If it hasn’t, apply a little more heat to the appropriate area, being careful not to over heat. Finishing the joint is exactly is exactly the same as for end feed fittings. The only difference when rectifying a fault is, if you reuse the fitting after a failed attempt you will need to add solder to the joint as with an end feed fitting. It's however, probably better practice to use a new fitting.
Common problems
Over heating
This is probably the most common mistake made by people when they first start soldering. If this happens the flux will burn, it usually starts turning black and the solder won’t run into the joint. To remedy, dismantle the joint and start from scratch.
Insufficient cleaning
Although modern fluxes do most of the work for you, the almost fool proof route to a good joint is to pay very careful attention to cleaning all the components. If the solder hasn’t run around the joint once you reach the correct temperature, a dirty joint is most likely the cause.
If you are modifying existing pipe work that has carried oil or bio, simply cleaning the joint may not be adequate. If there are traces of oil in the pipe, once heated, it will quickly run and spread to cleaned areas. Prevention is the best cure. Before solderin, wash the pipe internally with boiling water and detergent, scrubbing with a stiff brush (bottle brush internally) and then clean joint as normal.
Insufficient heat
If the solder won’t melt when touched on the surface of a hot joint, it’s pretty obviously not hot enough. Don’t play the torch on the solder, it will melt in a blob and sit on the surface without running or fall off onto the floor. The obvious answer is to apply more heat but keep testing with the solder to check when the correct temperature is reached.
In some circumstances you may not reach the correct temperature. The most likely reason is too much of a heat sink effect as with soldering onto the processor. In this case the large surface area of the processor is conducting heat away from the joint faster than your torch can put it in! The remedy is to use a hotter torch. MAPP gas torches, although a little more expensive are far better for this type of work.
The second reason is likely to be liquid remaining in the pipes, if modifying existing pipe work. Liquid is highly efficient at removing heat, in the case of water it will be boiling away to steam. The remedy is obviously to remove the liquid, clean the joint and start again.
Movement after the joint is made
Again obvious, but once the solder has run into the joint and you are satisfied with its integrity, leave it alone until it’s cooled completely. If you are concerned about aesthetics, you can wipe off snots and runs whilst the solder is still molten but it will be worth giving it a light blast of additional heat just to ensure a sound joint.
Problems of this nature, although the joint may look good, will manifest them selves as slight weeps. If the pipe has carried oil it is very unlikely that you will be able to rectify the problem without unsoldering the joint and starting from scratch as traces of oil will remain in the joint and will prevent any further adhesion.
See also
Bio-rich-time-poor 13:40, 4 December 2010 (UTC)
