Difference between revisions of "Posting photos"
(→Tinypic) |
(→Posting to Imgshack - video) |
||
| (15 intermediate revisions by 2 users not shown) | |||
| Line 8: | Line 8: | ||
==Posting on the forum== | ==Posting on the forum== | ||
| − | The forum software cannot store photos, so you will need to save your photo somewhere on the internet where the forum has constant access to it. | + | The forum software cannot store photos, so you will need to save your photo somewhere on the internet where the forum has constant access to it. There are several sites which will save or host photos for you. |
===Tinypic=== | ===Tinypic=== | ||
| + | The following example shows Tinypic.com, as being one of the easiest to use. | ||
| − | |||
| − | |||
| − | |||
| − | |||
====Step 1==== | ====Step 1==== | ||
| Line 73: | Line 70: | ||
Highlight the code in the "IMG Code for Forums & Message Boards", box. Copy it and paste it where you want the photo to appear in your forum post. | Highlight the code in the "IMG Code for Forums & Message Boards", box. Copy it and paste it where you want the photo to appear in your forum post. | ||
| + | |||
| + | |||
| + | ===Posting to tinypic - video=== | ||
| + | |||
| + | The above steps are shown in this video courtesy of Rotary-Motion | ||
| + | |||
| + | {{#ev:youtube|RhWYwReUL28|600||Video on how to upload pictures - source: Rotary-Motion}} | ||
| + | |||
| + | |||
| + | ===Posting to Imageshack - video=== | ||
| + | |||
| + | {{#ev:youtube|RZycaEw6YEc|600||Video on how to upload pictures - source: Rotary-Motion}} | ||
==Up loading to the wiki== | ==Up loading to the wiki== | ||
| + | |||
| + | Unlike the forum, the wiki needs to have photos uploaded to it's software. To do this the files must be located on your computer, you cannot link to photos on other websites. The file size needs to be less than 2Mb or the software will reject the photo an advise you to that effect. | ||
| + | |||
| + | Before uploading to the wiki, please ensure you own the photo or that you have permission from the copyright holder to use it. | ||
| + | |||
| + | |||
| + | ====Step 1==== | ||
| + | ---- | ||
| + | |||
| + | |||
| + | From the toolbox menu, bottom left of any wiki page, click "Upload file". | ||
| + | |||
| + | |||
| + | [[File: Wiki_upload1.png|600px]] | ||
| + | |||
| + | |||
| + | |||
| + | ====Step 2==== | ||
| + | ---- | ||
| + | |||
| + | |||
| + | Click "Browse". | ||
| + | |||
| + | |||
| + | [[File: Wiki_upload2.png|600px]] | ||
| + | |||
| + | |||
| + | |||
| + | ====Step 3 ==== | ||
| + | ---- | ||
| + | |||
| + | |||
| + | You'll be presented with this window which shows the files stored on your computer. Find the file you wish to upload, highlight it and click "Open". | ||
| + | |||
| + | |||
| + | [[File: Wiki_upload3.png|600px]] | ||
| + | |||
| + | |||
| + | |||
| + | ====Step 4 ==== | ||
| + | ---- | ||
| + | |||
| + | |||
| + | In the "Summery" box add details of any permissions from the copyright owner or confirm that you own the photo and you're happy for it to be used on the wiki, you can use your forum name to do so. Then click "Upload file". | ||
| + | |||
| + | |||
| + | [[File: Wiki_upload4.png|600px]] | ||
| + | |||
| + | |||
| + | |||
| + | |||
| + | ====Step 5 ==== | ||
| + | ---- | ||
| + | |||
| + | |||
| + | This is the final screen you'll be shown, confirming that your photo was successfully uploaded. The highlighted title is the text you use to put the photo in a wiki page. | ||
| + | |||
| + | |||
| + | [[File: Wiki_upload5.png|600px]] | ||
| + | |||
| + | |||
| − | + | [[User:Julian|Julian]] ([[User talk:Julian|talk]]) 08:33, 12 April 2013 (BST) | |
Latest revision as of 21:19, 12 April 2013
Posting a photo or picture on the wiki and the forum requires two different procedures.
Contents
Posting on the forum
The forum software cannot store photos, so you will need to save your photo somewhere on the internet where the forum has constant access to it. There are several sites which will save or host photos for you.
Tinypic
The following example shows Tinypic.com, as being one of the easiest to use.
Step 1
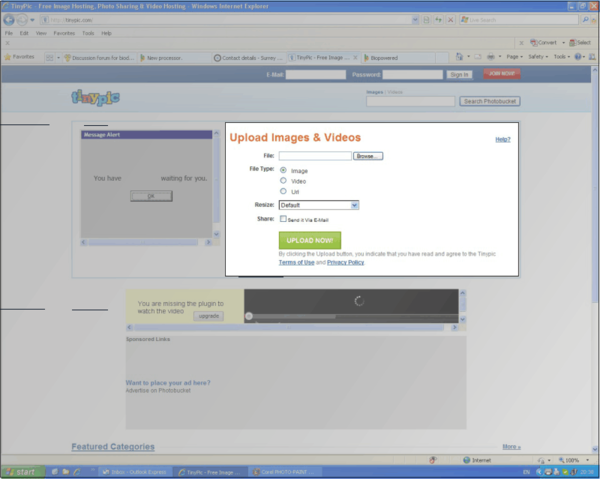
Go to tinypic.com by clicking this link and you should be presented with a page like this:
Ignore all the adverts and flashing graphics, you're only interested in the highlighted area.
Step 2
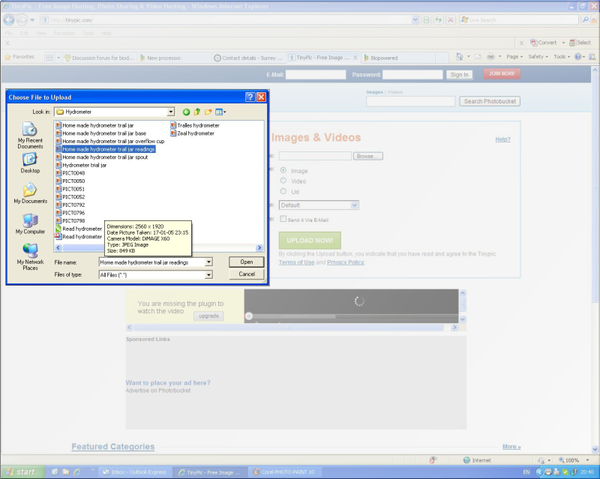
Click "Browse" and a window like this should appear:
This window shows the files stored on your computer. Find the file you wish to upload, highlight it and click "Open".
Step 3
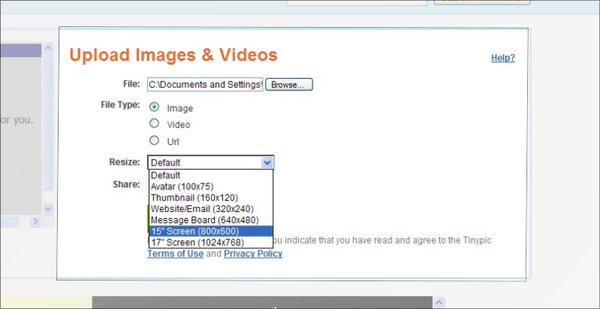
Back on the tinypic page, select "Image" or "Video" as appropriate. Click the resize drop down and select either (800x600) or (640x480). The first will give a slightly larger picture, but either will do.
Step 4
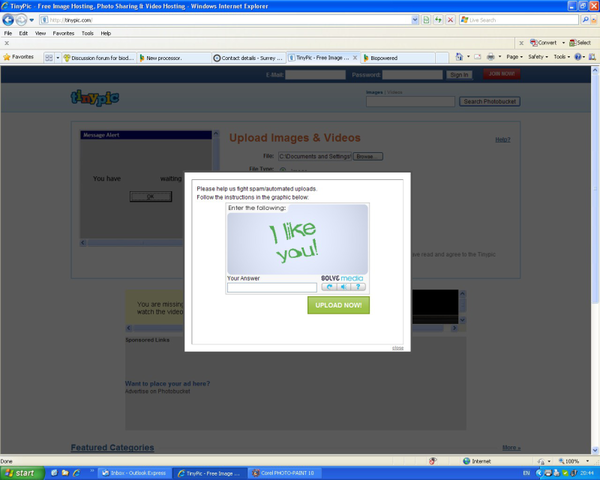
Click "UPLOAD NOW!" and you'll be presented with a captcha screen like this (it's just a deterrent to spammers):
Follow the instructions on the captcha screen and click "UPLOAD NOW!".
Step 5
You'll then be presented with this screen:
Highlight the code in the "IMG Code for Forums & Message Boards", box. Copy it and paste it where you want the photo to appear in your forum post.
Posting to tinypic - video
The above steps are shown in this video courtesy of Rotary-Motion
Posting to Imageshack - video
Up loading to the wiki
Unlike the forum, the wiki needs to have photos uploaded to it's software. To do this the files must be located on your computer, you cannot link to photos on other websites. The file size needs to be less than 2Mb or the software will reject the photo an advise you to that effect.
Before uploading to the wiki, please ensure you own the photo or that you have permission from the copyright holder to use it.
Step 1
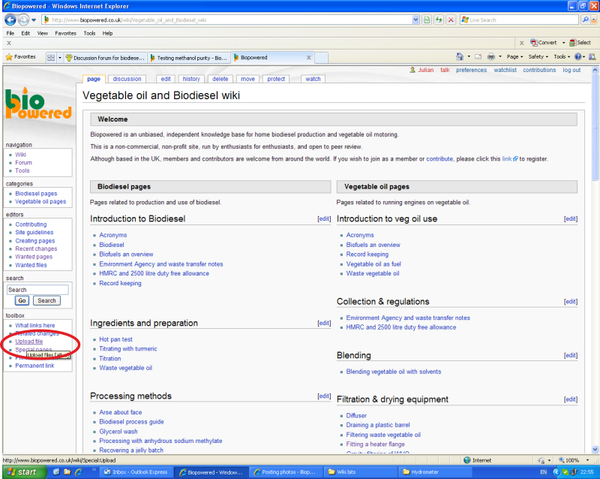
From the toolbox menu, bottom left of any wiki page, click "Upload file".
Step 2
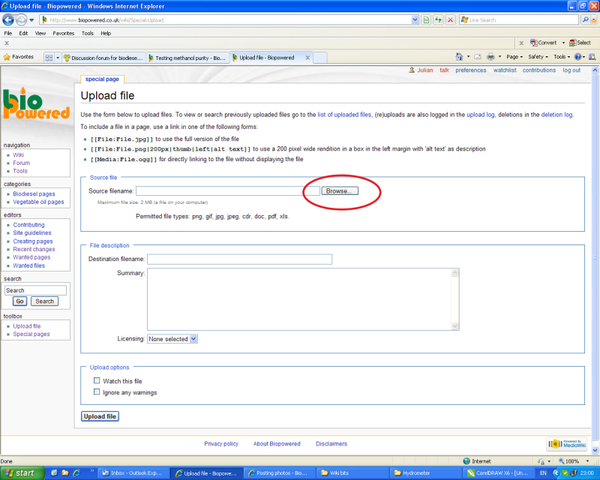
Click "Browse".
Step 3
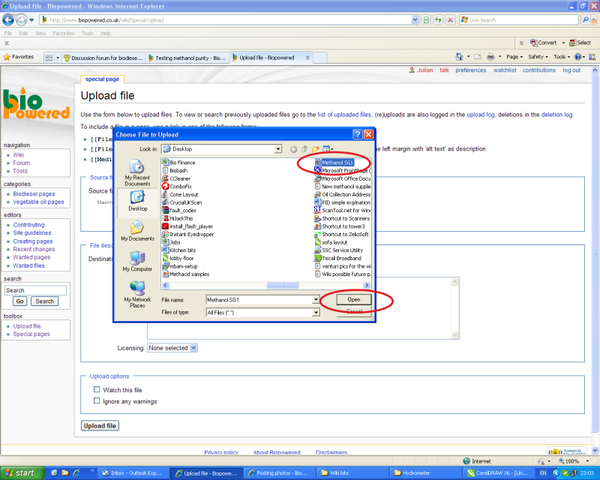
You'll be presented with this window which shows the files stored on your computer. Find the file you wish to upload, highlight it and click "Open".
Step 4
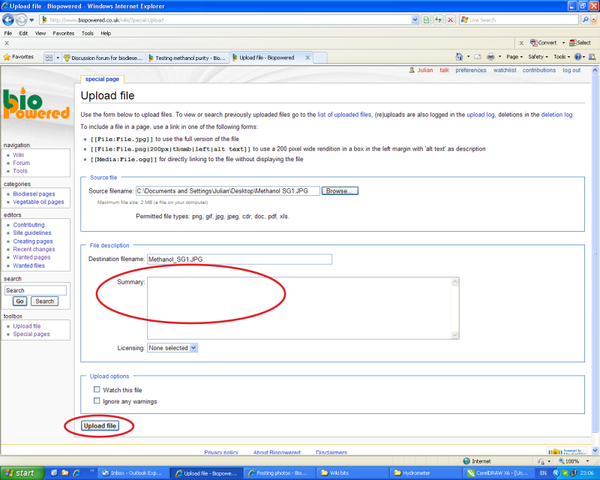
In the "Summery" box add details of any permissions from the copyright owner or confirm that you own the photo and you're happy for it to be used on the wiki, you can use your forum name to do so. Then click "Upload file".
Step 5
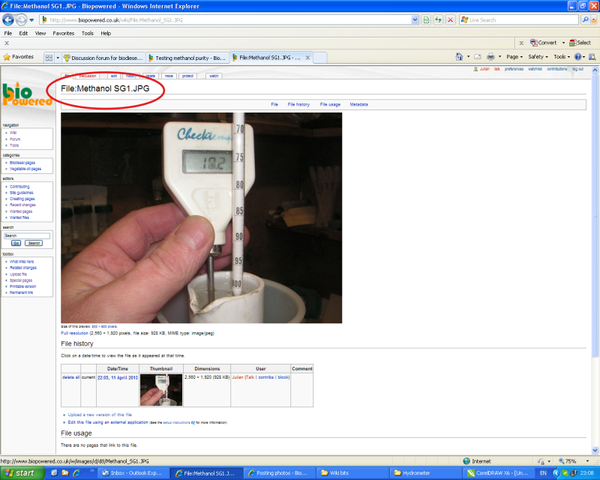
This is the final screen you'll be shown, confirming that your photo was successfully uploaded. The highlighted title is the text you use to put the photo in a wiki page.
