Difference between revisions of "Viscosity cup"
(→DIY Viscosity Cup) |
|||
| (3 intermediate revisions by the same user not shown) | |||
| Line 1: | Line 1: | ||
| − | |||
| − | + | [[File:Viscosity cup and timer.jpg|500px|right]] | |
| − | |||
| − | |||
| − | Guestimate the centre of the ladle cup and centre punch it from the | + | [[File:Viscosity cup with hole.jpg|500px|right]] |
| − | hollow side to prevent the drill bit from skidding over the surface. | + | |
| − | Carefully drill the centre hole with a small sharp drill bit, 1/16 in. | + | '''DIY Viscosity Cup''' |
| − | (1.6mm) is a good size to start with. | + | |
| − | The final hole size depends upon the capacity of the ladle, the viscosity | + | |
| − | of the liquid being tested and the timing accuracy required. It is a case | + | Here is design for a viscosity cup that is easy to make. All you need is a soup ladle, preferably stainless steel, from your local charity shop, some small drill bits and a bench or hand drill. |
| − | of trial and error to achieve the desired timing result but it is not at all | + | |
| + | |||
| + | Guestimate the centre of the ladle cup and centre punch it from the hollow side to prevent the drill bit from skidding over the surface. Carefully drill the centre hole with a small sharp drill bit, 1/16 in.(1.6mm) is a good size to start with. | ||
| + | The final hole size depends upon the capacity of the ladle, the viscosity of the liquid being tested and the timing accuracy required. It is a case of trial and error to achieve the desired timing result but it is not at all | ||
difficult. | difficult. | ||
| − | |||
| − | |||
| − | The ladle I used had 100ml capacity and a centre hole of 3mm dia. | + | Only increase the size of the hole in small increments to avoid having too large a hole and the resulting short draining time and poor accuracy. |
| − | This gave me a time of 38 seconds, resulting in an accuracy of around | + | |
| − | 2.5%, which is more than adequate for most purposes. | + | |
| + | The ladle I used had 100ml capacity and a centre hole of 3mm dia. This gave me a time of 38 seconds, resulting in an accuracy of around 2.5%, which is more than adequate for most purposes. | ||
| + | |||
| + | |||
| + | To use your viscosity cup, totally immerse the cup bowl in the liquid to be tested. With stopwatch in hand, start timing when the rim of the cup just breaks the surface as you withdraw it from the liquid and stop | ||
| + | timing just as the liquid stream from the centre hole of the cup breaks into droplets. | ||
| + | |||
| − | + | The reason I made this viscosity cup was to make sure that the viscosity of my biodiesel, when blended with mixed fuel was the same | |
| − | + | as that of heating oil, for the oil burning C/H boiler that I had just obtained. It could also be used to check the viscosity of a WVO/petrol/mixed fuel blend prior to using in the vehicle as the cold weather approaches. For that purpose I didn't need it to be calibrated as it was just for the comparison of the viscosity of the two liquids. | |
| − | |||
| − | |||
| − | |||
| − | |||
| − | |||
| − | |||
| − | |||
| − | |||
| − | |||
| − | |||
| − | |||
| − | A calibrated version could easily be made by gradually reaming out the | + | A calibrated version could easily be made by gradually reaming out the centre hole and checking the timing with a liquid of known viscosity when used at the specified temperature. |
| − | centre hole and checking the timing with a liquid of known viscosity | ||
| − | when used at the specified temperature. | ||
| − | |||
| − | |||
| − | + | [[User:Falcon|Falcon]] 00:05, 21 November 2011 (BST) | |
| − | + | [[Category:Biodiesel]] | |
| + | [[Category:Safety and Testing]] | ||
| + | [[Category:Vegetable oil]] | ||
| + | [[Category:Testing]] | ||
Latest revision as of 01:12, 4 March 2013
DIY Viscosity Cup
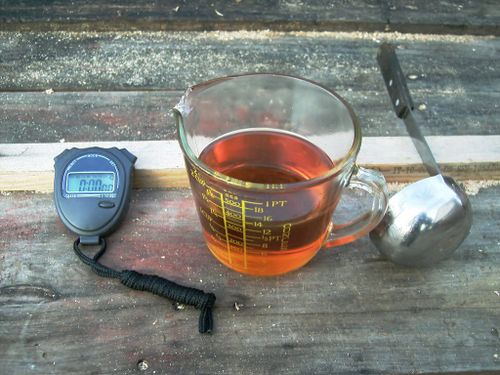
Here is design for a viscosity cup that is easy to make. All you need is a soup ladle, preferably stainless steel, from your local charity shop, some small drill bits and a bench or hand drill.
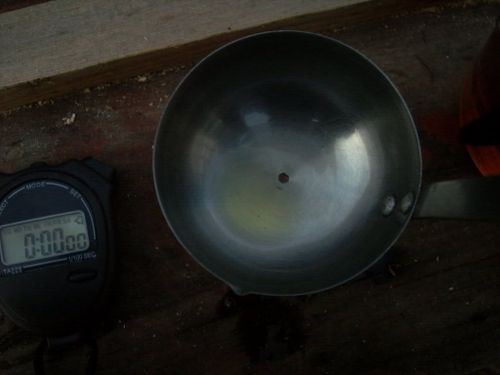
Guestimate the centre of the ladle cup and centre punch it from the hollow side to prevent the drill bit from skidding over the surface. Carefully drill the centre hole with a small sharp drill bit, 1/16 in.(1.6mm) is a good size to start with.
The final hole size depends upon the capacity of the ladle, the viscosity of the liquid being tested and the timing accuracy required. It is a case of trial and error to achieve the desired timing result but it is not at all
difficult.
Only increase the size of the hole in small increments to avoid having too large a hole and the resulting short draining time and poor accuracy.
The ladle I used had 100ml capacity and a centre hole of 3mm dia. This gave me a time of 38 seconds, resulting in an accuracy of around 2.5%, which is more than adequate for most purposes.
To use your viscosity cup, totally immerse the cup bowl in the liquid to be tested. With stopwatch in hand, start timing when the rim of the cup just breaks the surface as you withdraw it from the liquid and stop
timing just as the liquid stream from the centre hole of the cup breaks into droplets.
The reason I made this viscosity cup was to make sure that the viscosity of my biodiesel, when blended with mixed fuel was the same
as that of heating oil, for the oil burning C/H boiler that I had just obtained. It could also be used to check the viscosity of a WVO/petrol/mixed fuel blend prior to using in the vehicle as the cold weather approaches. For that purpose I didn't need it to be calibrated as it was just for the comparison of the viscosity of the two liquids.
A calibrated version could easily be made by gradually reaming out the centre hole and checking the timing with a liquid of known viscosity when used at the specified temperature.
Falcon 00:05, 21 November 2011 (BST)

