Difference between revisions of "Water in fuel - test kit"
(Created page with "The bit of code below assists indexing on search engines. Replace "Biodiesel new page" with a very brief description of what the page is about. Then delete this text. <metadesc...") |
|||
| (26 intermediate revisions by 5 users not shown) | |||
| Line 1: | Line 1: | ||
| − | |||
| − | |||
<metadesc>How to make a homemade water test kit</metadesc> | <metadesc>How to make a homemade water test kit</metadesc> | ||
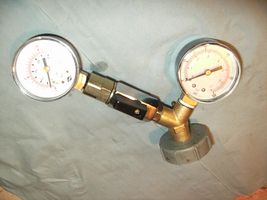
| + | How to make a cheap water test kit,this wont have the accuracy of the well known version but is more portable than a manometer. | ||
| + | The accuracy is reliant on the quailty of the gauges bought. | ||
| − | + | [[File:KN_water_test_kit_005.jpg|500px|thumb|right|fully assembled]] | |
| − | |||
| − | |||
| − | |||
| − | |||
| − | |||
| − | |||
| − | |||
| − | [[File:KN_water_test_kit_005.jpg| | ||
| Line 18: | Line 10: | ||
__TOC__ | __TOC__ | ||
| − | |||
| − | |||
| − | |||
| − | |||
| − | |||
| − | |||
| − | |||
| − | |||
| − | |||
| − | |||
| − | |||
| − | |||
| − | |||
| − | |||
| − | |||
| − | |||
| − | |||
| − | |||
| − | |||
| − | == | + | ==Parts list== |
| − | + | *1/4" pressure gauge 0-15 psi | |
| + | *1/4" pressure gauge 0-100 psi | ||
| + | *1/4" Y piece | ||
| + | *1/4" Ball valve | ||
| + | *Bicycle "presta" valve | ||
| + | *1/4" male stopend | ||
| + | *2 x 43mm solvent weld access plugs | ||
| + | *43mm solvent weld joiner | ||
| + | *Small plastic cap/cup | ||
| + | *Small marble | ||
| + | *Viton O ring | ||
| + | Instead of the presta valve and 0-15 gauge you can use a low pressure gauge designed for motorcycle forks which has a button | ||
| + | for releasing the pressure | ||
| − | + | total cost roughly £20 (dependent on gauges used) | |
| − | |||
| − | |||
| − | |||
| − | === | + | ==Assembly instuctions== |
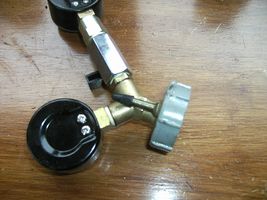
| − | + | *Put the plumbing together as in the photo with the low pressure gauge on the valved side | |
| + | *Drill a hole in the stopend | ||
| + | *Weld both access plugs to the joiner | ||
| + | *Weld one screw cap on | ||
| + | *Drill two holes in the unwelded cap,one for the male stopend,one for the presta valve | ||
| + | *Fit the stopend through the hole into the Y piece and seal (I used araldite) | ||
| + | *Fit the valve using two of the round nuts that stop the valve creeping and seal | ||
| + | *Replace the rubber seal in the lid with a Viton one | ||
| + | *Glue the small cap to the inside about 3/4" down | ||
| + | *Drop in the marble | ||
| − | + | <gallery caption="General view with lid removed" widths="300px" heights="200px" perrow="2" align="center"> | |
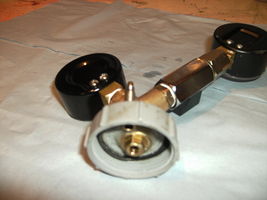
| + | File:KN_water_test_kit_003.jpg|Gauge assembled | ||
| + | File:KN_water_test_kit_001.jpg|Inside view | ||
| + | </gallery> | ||
| + | ==Ingredients== | ||
| + | The reagent | ||
| − | + | Dry solvent | |
| + | This kit will work with calcium hydride (CaH2) and calcium carbide (CaC2)as the reagent,the hydride gives a quicker result and produces more gas (hydrogen) but is hard to source whereas carbide is available from a well known internet auction site (£15/500g @4/2011 ) | ||
| + | For a dry solvent you can use petrol or white spirits. | ||
| + | ==The idea== | ||
| + | The idea is that any water in the test liquid will react with the calcium and produce a gas (hydrogen),the pressure created is registered on the gauges. | ||
| + | The dry solvent dilutes the test liquid and allows any water present to get to the reagent quicker. | ||
| − | |||
| − | |||
| − | |||
| − | |||
| − | |||
| − | |||
| + | ==The method== | ||
| + | With my one shown above ive found that 35ml of test liquid and 10ml of dry solvent combined with 7gr of calcium carbide is an ideal amount. | ||
| + | I grind 7 grammes of calcium and place in the small holder inside then put the two liquids into the vessel, screw the lid on and invert and shake (the marble helps the mixing action)there should be an immediate showing on the lower gauge, keep and eye on the gauge and if it looks like its going to go off the scale shut the valve to the lower gauge and read off the higher one. | ||
| + | Take the reading at a set amount of time and try to keep the temp of the tests as constant as posible. | ||
| + | The one shown will give a reading from 11 psi with dry oil upto 80 psi with a water content of 4000 ppm. | ||
| + | The cycle valve is for releasing a fast rising pressure or when finished. | ||
| + | This type of valve has a knurled nut which i leave undone so if the pressure starts to rise too high it can be released by touching a implement such as a screwdriver to it (DO NOT USE YOUR FINGER) | ||
| − | |||
| − | |||
| − | + | ==ASTM== | |
| − | + | The maximum PPM in vegetable oil is <400 | |
| + | The maximum PPM in biodiesel is <500 EN14214 | ||
| − | + | Biodiesel will hold 1500 ppm of water before going cloudy. | |
| − | |||
| − | + | ==Calibrating== | |
| − | + | Obviously the more accurate you are with this the better the accuracy of the finished kit. | |
| − | + | I used new vegetable oil and distilled water to make up various PPM mixes and plotted the result on a graph, this is then used when test your liquid, make sure the vessel is cleaned well between tests. | |
| − | |||
| − | |||
| − | + | ==Warning== | |
| − | + | Do not use on a liquid that is obviously wet, I have taken mine above 80psi and when it reaches its limit the gas escapes from the threaded cap BUT there is a danger it could explode at high pressures. | |
| − | |||
| + | Hydrogen a highly explosive gas is made when using this kit. | ||
| + | <gallery caption="Rear view of cap showing location of Presta valve" widths="300px" heights="200px" perrow="2" align="center"> | ||
| + | File:inside.jpg|View of inside the cap | ||
| + | File:Back.jpg|rear view | ||
| + | </gallery> | ||
| − | |||
| − | + | [[User:KH|KH]] 19:44, 27 August 2011 (BST) | |
| − | + | [[Category:Biodiesel]] | |
| − | |||
| − | |||
| − | |||
| − | |||
| − | |||
| − | |||
| − | |||
| − | |||
| − | |||
| − | |||
| − | |||
| − | |||
[[Category:Safety and Testing]] | [[Category:Safety and Testing]] | ||
| − | |||
| − | |||
| − | |||
[[Category:vegetable oil]] | [[Category:vegetable oil]] | ||
| − | |||
| − | |||
| − | |||
| − | |||
| − | |||
[[Category:Testing]] | [[Category:Testing]] | ||
| − | |||
| − | |||
| − | |||
| − | |||
| − | |||
| − | |||
| − | |||
Latest revision as of 19:54, 8 March 2013
How to make a cheap water test kit,this wont have the accuracy of the well known version but is more portable than a manometer. The accuracy is reliant on the quailty of the gauges bought.

Contents
Parts list
- 1/4" pressure gauge 0-15 psi
- 1/4" pressure gauge 0-100 psi
- 1/4" Y piece
- 1/4" Ball valve
- Bicycle "presta" valve
- 1/4" male stopend
- 2 x 43mm solvent weld access plugs
- 43mm solvent weld joiner
- Small plastic cap/cup
- Small marble
- Viton O ring
Instead of the presta valve and 0-15 gauge you can use a low pressure gauge designed for motorcycle forks which has a button for releasing the pressure
total cost roughly £20 (dependent on gauges used)
Assembly instuctions
- Put the plumbing together as in the photo with the low pressure gauge on the valved side
- Drill a hole in the stopend
- Weld both access plugs to the joiner
- Weld one screw cap on
- Drill two holes in the unwelded cap,one for the male stopend,one for the presta valve
- Fit the stopend through the hole into the Y piece and seal (I used araldite)
- Fit the valve using two of the round nuts that stop the valve creeping and seal
- Replace the rubber seal in the lid with a Viton one
- Glue the small cap to the inside about 3/4" down
- Drop in the marble
- General view with lid removed
Gauge assembled
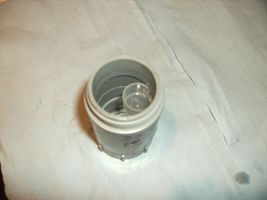
Inside view


Ingredients
The reagent
Dry solvent
This kit will work with calcium hydride (CaH2) and calcium carbide (CaC2)as the reagent,the hydride gives a quicker result and produces more gas (hydrogen) but is hard to source whereas carbide is available from a well known internet auction site (£15/500g @4/2011 ) For a dry solvent you can use petrol or white spirits.
The idea
The idea is that any water in the test liquid will react with the calcium and produce a gas (hydrogen),the pressure created is registered on the gauges. The dry solvent dilutes the test liquid and allows any water present to get to the reagent quicker.
The method
With my one shown above ive found that 35ml of test liquid and 10ml of dry solvent combined with 7gr of calcium carbide is an ideal amount. I grind 7 grammes of calcium and place in the small holder inside then put the two liquids into the vessel, screw the lid on and invert and shake (the marble helps the mixing action)there should be an immediate showing on the lower gauge, keep and eye on the gauge and if it looks like its going to go off the scale shut the valve to the lower gauge and read off the higher one. Take the reading at a set amount of time and try to keep the temp of the tests as constant as posible. The one shown will give a reading from 11 psi with dry oil upto 80 psi with a water content of 4000 ppm. The cycle valve is for releasing a fast rising pressure or when finished. This type of valve has a knurled nut which i leave undone so if the pressure starts to rise too high it can be released by touching a implement such as a screwdriver to it (DO NOT USE YOUR FINGER)
ASTM
The maximum PPM in vegetable oil is <400
The maximum PPM in biodiesel is <500 EN14214
Biodiesel will hold 1500 ppm of water before going cloudy.
Calibrating
Obviously the more accurate you are with this the better the accuracy of the finished kit. I used new vegetable oil and distilled water to make up various PPM mixes and plotted the result on a graph, this is then used when test your liquid, make sure the vessel is cleaned well between tests.
Warning
Do not use on a liquid that is obviously wet, I have taken mine above 80psi and when it reaches its limit the gas escapes from the threaded cap BUT there is a danger it could explode at high pressures.
Hydrogen a highly explosive gas is made when using this kit.
- Rear view of cap showing location of Presta valve
View of inside the cap
rear view


KH 19:44, 27 August 2011 (BST)