Difference between revisions of "Casting a venturi"
(→Core geometry and dimensions) |
(→Core geometry and dimensions) |
||
| Line 41: | Line 41: | ||
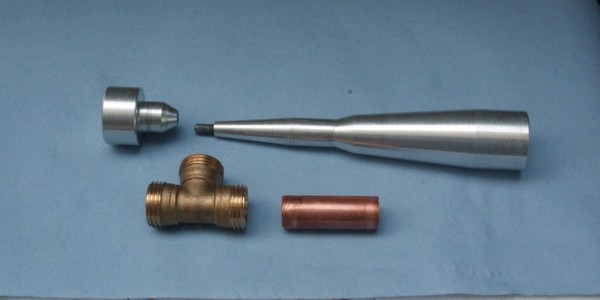
As an alternative, metal cores can be assembled using a central length of studding or a bolt to pull the two halves together and, with a slightly different design of core, blank the ends at the same time. Or a male and female thread can be created at the throat to provide both the location and clamping action, as in this excellent example by NigelB. | As an alternative, metal cores can be assembled using a central length of studding or a bolt to pull the two halves together and, with a slightly different design of core, blank the ends at the same time. Or a male and female thread can be created at the throat to provide both the location and clamping action, as in this excellent example by NigelB. | ||
| + | |||
[[File:NigelBs_venturi_cores1.jpg]] | [[File:NigelBs_venturi_cores1.jpg]] | ||
| Line 51: | Line 52: | ||
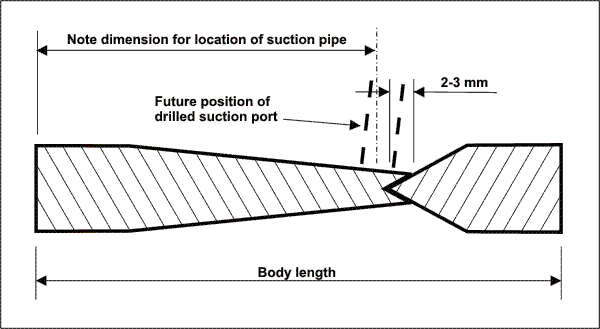
The position for the suction connection now needs to be established to enable the manufacture of the body. The suction port will be drilled through the cast lead, concentrically down the suction pipe. The suction port should penetrate the 10° discharge cone as close as possible to the throat but not break into inlet cone. As the throat will be cleaned up by drilling at a later stage it’s preferable to leave a little tolerance to allow for this. Aim to have the edge of the suction port approximately 2-3 mm from the throat. | The position for the suction connection now needs to be established to enable the manufacture of the body. The suction port will be drilled through the cast lead, concentrically down the suction pipe. The suction port should penetrate the 10° discharge cone as close as possible to the throat but not break into inlet cone. As the throat will be cleaned up by drilling at a later stage it’s preferable to leave a little tolerance to allow for this. Aim to have the edge of the suction port approximately 2-3 mm from the throat. | ||
| + | |||
[[File:Venturi_dimensions_2.gif]] | [[File:Venturi_dimensions_2.gif]] | ||
Revision as of 21:02, 19 November 2010
This method of venturi manufacture comprises casting lead into a copper pipe mould using cores which create the specially shaped internal voids.
With care these can be manufactured with only the minimum of hand tools. The method involves melting lead (around 327°C) so suitable precautions should be taken when carrying out this process.
Contents
Cores
Cores can be made from several materials, steel, aluminium, wood or even plaster. Each has its benefits and drawbacks:
Steel
Will give an excellent finish to the internal faces of the venturi and is durable. It requires the use of a release agent without which there is risk the lead adhering, making it impossible to remove the cores. A lathe will be required to manufacture steel cores. The ends should be drilled and tapped to accept bolts to facilitate removal after casting.
Aluminium
Will give a reasonable finish but may degrade with multiple use. It doesn't require a release agent but a lathe will be required to make the cores. The ends should be drilled and tapped to accept bolts to facilitate removal after casting.
Wood
Will give a poor finish and can only be used once. Charring may evolve gas as the molten lead is pored worsening the finish. Wood cores do not require any special tools and can be made quite simply by whittling, filing and sanding. A wood csrew can be inserted into the ends after casting to facilitate removal.
Plaster
I haven't tried this yet but if a wood core is pushed into some Plasticine, plaster can be poured into the mould to create a core. Plaster cores will probably not give a smooth finish and will most likely be destroyed when removed. The plaster must be thoroughly dry before pouring the molten lead.
Core geometry and dimensions
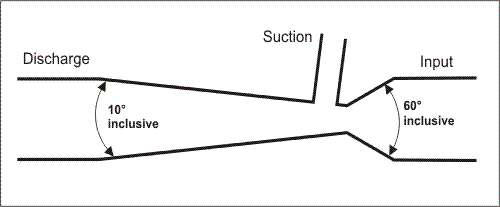
Whilst the dimensions of venturies will vary depending on the performance of the pump and the size of pipe work with which they are used, the basic geometry remains the same. The inlet cone should be 60° inclusive, and the discharge cone 10° inclusive.
Cores dimensions should be as follows:
Where the two cores meet at the throat, some form of location is required to ensure concentricity. The arrangement shown above is better suited to metal cores.
As an alternative, metal cores can be assembled using a central length of studding or a bolt to pull the two halves together and, with a slightly different design of core, blank the ends at the same time. Or a male and female thread can be created at the throat to provide both the location and clamping action, as in this excellent example by NigelB.
Wood or plaster cores could have flat ends with a small nail or panel pin placed centrally to aid location.
Assemble the cores and measure their overall length, this will be the length of the venturi body.
The position for the suction connection now needs to be established to enable the manufacture of the body. The suction port will be drilled through the cast lead, concentrically down the suction pipe. The suction port should penetrate the 10° discharge cone as close as possible to the throat but not break into inlet cone. As the throat will be cleaned up by drilling at a later stage it’s preferable to leave a little tolerance to allow for this. Aim to have the edge of the suction port approximately 2-3 mm from the throat.
Body
Casting
Finishing
--Bio-rich-time-poor 12:25, 13 November 2010 (UTC)


